End-to-end Identity
CipherStash Proxy can associate the identity of an application user, as well as additional context about a database statement. This information is included in data access logs for improved visibility.
User identity and context information can be set using the SET CS_IDENTITY and SET CS_CONTEXT commands. These commands behave similarly to other PostgreSQL SET commands but are only available when connecting via CipherStash Proxy. The command arguments values are never passed on to the database itself.
Adding these commands to your application unlocks powerful new capabilities.
Available commands:
SET CS_IDENTITY { TO | = } 'jwt_token'SET CS_CONTEXT { TO | = } 'json'RESET {CS_IDENTITY | CS_CONTEXT}
Both Identity and Context data are tied to the current connection or transaction context. The application is responsible for ensuring that data is reset.
SET CS_IDENTITY takes a JWT as an argument. For example:
1-- full JWT not shown (it might be quite large)
2SET CS_IDENTITY TO 'eyJhbGciOiJSUzI1NiIsIn...';
You can run SET CS_IDENTITY at any time and all subsequent statements will be associated with the identity. The typical approach is to set the identity for every statement or transaction.
For example, the following will record data accesses to the user's table against the user specified by the JWT given to SET CS_IDENTITY.
1SET CS_IDENTITY TO 'eyJhbGciOiJSUzI1NiIsIn...';
2SELECT name, email FROM users;
JWTs are credentials, which can grant access to resources. Be careful where you paste them!
SET CS_CONTEXT accepts arbitrary JSON data to be associated with the data access logs. The context data can be used to refine search and analysis in the dashboard.
For example, to associate the version of the application used when making the request:
1SET CS_CONTEXT TO '{"app_version": "2.7.3"}`;Each JWT is issued by an identity provider. This might be your application or a 3rd party Identity Provider such as Auth0. A JWT can also include "claims" which provide information about its intended usage, the service that issued it and who it was generated for.
CipherStash proxy requires the following claims to be present on any JWT passed to SET CS_IDENTITY:
| Claim | Meaning | How its used by CipherStash Proxy |
|---|---|---|
iss | The identity provider that issued this JWT. Usually a URL. | Checked against an allow-list before the JWT is accepted |
aud | The intended service for this JWT | Checked against an allow-list before the JWT is accepted. Record in data-access logs. |
sub | Identity of user (or machine) the JWT was issued to | Recorded in data-access logs |
See RFC: 7519 JSON Web Token for further details.
To add a trusted identity provider to CipherStash Proxy, you can specify an Issuer (iss claim) and Audience (aud claim) that must be present in a JWT using the Cipherstash CLI.
The following assumes you have the CLI configured.
Add an authorised issuer and audience to your account:
1stash identify provider trust \
2  --issuer auth.domain.com \
3  --audience api.domain.com
The issuer should be the domain that hosts the JSON Web Key issued by the Authorisation Server:
1https://{issuer}/.well-known/jwks.jsonThe audience should be the audience value in your JWT.
Multiple values can be provided for both issuer and audience as comma-delimited strings
1stash identify provider trust \
2  --issuer "auth.domain.com, auth.domain.org" \
3  --audience "api.domain.com, api.domain.org"
We expect fully qualified, valid URLs including the https:// scheme, but the CLI will try and normalize the url for you.
For example:
1auth.domain.com => https://auth.domain.com/Both forms of the URL will be accepted.
If you're still not sure what values to use, you can inspect a JWT using JWT.io. For example, below is a JWT issued by the CipherStash Auth0 tenant:
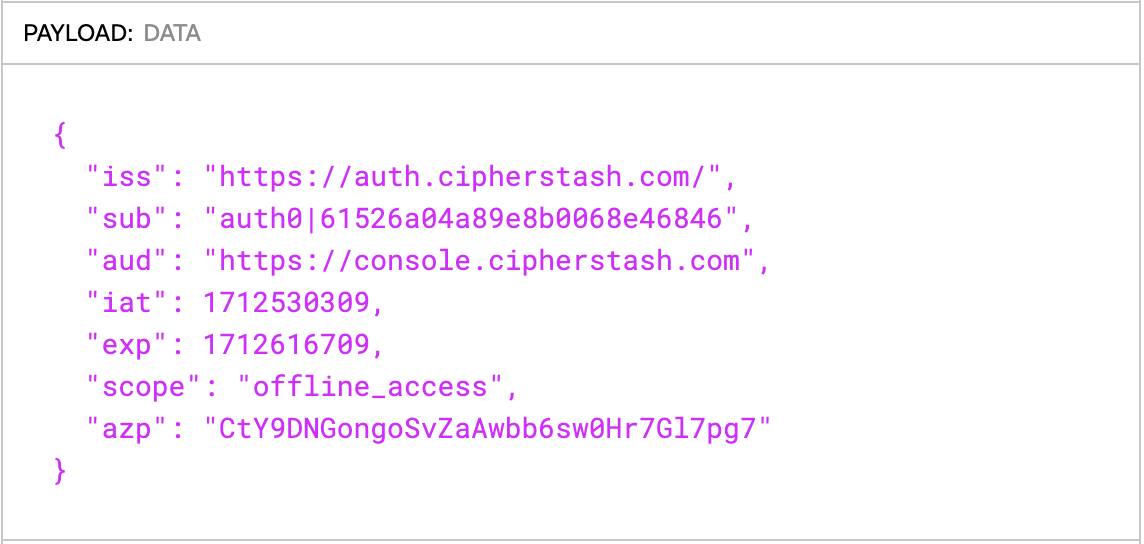
You can see that the iss claim is set to https://auth.cipherstash.com/ and the aud is set to https://console.cipherstash.com. To trust JWTs with these claims the command would be as follows:
1stash identify provider trust \
2  --issuer "auth.cipherstash.com" \
3 --audience "console.cipherstash.com"Revoke an issuer so that JWTs signed by it are no longer trusted.
1stash identify provider revoke --issuerFor example:
1stash identify provider revoke --issuer "auth.example.net"See the Command-line reference for stash for more details.
SQL Command to set a JWT token that will be verified and decoded.
1SET CS_IDENTITY { TO | = } 'jwt_token'The SET CS_IDENTITY command changes the run-time identity.
The input parameter is expected to be a valid JWT token.
The token is validated against authorised issuers and audiences configured in the CipherStash Workspace.
If issuer and audience are valid, the JWT token is decoded and the issuer, audience and subscriber values are extracted and propagated with the Statement Audit Log.
The JWT passed to SET CS_IDENTITY must contain trusted aud and iss claims for the workspace. See Configuring an Identity Provider
1-- Set JWT Token
2SET CS_IDENTITY = 'eyJhbGciOiJIUzI1NiIsInR5cCI6IkpXVCJ9.eyJpc3MiOiJodHRwczovL2lkLmNvbXBhbnkuY29tIiwiYXVkIjoiaHR0cHM6Ly9hcHAuY29tcGFueS5jb20iLCJzdWIiOiIxMjM0NTY3ODkwIiwibmFtZSI6IkpvaG4gRG9lIiwiaWF0IjoxNTE2MjM5MDIyfQ.pPpSemUg7GM2eDOz193lBojDFqqR2Hu5M5ovItXcFOA'1{
2 "iss": "https://id.company.com",
3 "aud": "https://app.company.com",
4 "sub": "1234567890",
5 "name": "John Doe",
6 "iat": 1516239022
7}Statements executed after the above SET CS_IDENTITY command will include the subject and audience. For example, the following query will result in a statement log entry similar to the below:
1SELECT name FROM users LIMIT 1;1{
2 "id": "d27341f8-dd3b-4498-bb4d-d9ccf7eb6bf9",
3 "workspace_id": "W9BODZQX2PQGD2DM",
4 "statement_id": "374d72c1-f09f-4eb4-ac69-c43de8f9c193",
5 // 'sub' claim from JWT passed to SET CS_IDENTITY
6 "identity": "1234567890",
7 // 'aud' claim JWT passed to SET CS_IDENTITY
8 "audience": "https://app.company.com",
9 "context": null,
10 "statement": "SELECT name FROM users LIMIT {REDACTED}",
11 "statement_fingerprint": "e529ebb63e482f0f",
12 "database": "postgres",
13 "database_pool_name": "postgres",
14 "database_host": "db",
15 "database_username": "postgres",
16 "created_at": "2024-06-25T09:11:21.292Z",
17 "type": "statement_received"
18}Immediately clear identity information.
1RESET CS_IDENTITYThe RESET CS_IDENTITY command clears the run-time identity data.
Sets arbitrary JSON data to be with statement Audit log.
1SET CS_CONTEXT { TO | = } '<json>';The SET CS_CONTEXT command changes the run-time context that is propagated with the Statement Audit Log.
The input parameter is expected to be a valid JSON string. The parameter will be checked to ensure it can be parsed as JSON, but no other restrictions or requirements apply.
If the input parameter is invalid, a parse error is returned.
Setting context will result in the additional information being included in statement audit logs.
1SET CS_CONTEXT TO '{"extra": "data"}';
2SELECT name FROM users LIMIT 1;
Statement audit log:
1{
2  "id": "d27341f8-dd3b-4498-bb4d-d9ccf7eb6bf9",
3  "workspace_id": "W9BODZQX2PQGD2DM",
4  "statement_id": "374d72c1-f09f-4eb4-ac69-c43de8f9c193",
5  "identity": null,
6  "audience": null,
7  // Context information passed to SET CS_CONTEXT
8  "context": {
9    "extra": "data"
10  },
11  "statement": "SELECT name FROM users LIMIT {REDACTED}",
12  "statement_fingerprint": "e529ebb63e482f0f",
13  "database": "postgres",
14  "database_pool_name": "postgres",
15  "database_host": "db",
16  "database_username": "postgres",
17  "created_at": "2024-06-25T09:11:21.292Z",
18  "type": "statement_received"
19}Immediately clear context information.
1RESET CS_CONTEXTThe RESET CS_CONTEXT command clears the run-time context.
In Rails, an around_action can SET and RESET the context or identity for all statements run inside the controller. Context data can be loaded or extracted from the session.
1class BaseController < ApplicationController
2  around_action :wrap_in_context
3
4  private
5    def wrap_in_context
6      begin
7        ActiveRecord::Base.connection.execute("SET CS_CONTEXT '{...}'")
8        yield
9      ensure
10        ActiveRecord::Base.connection.execute("RESET CS_CONTEXT")
11      end
12    end
13endIn transaction mode, a client is connected for the duration of a transaction. The connection is returned to the pool once the transaction is complete.
This mode is enabled by default.
An application can start a transaction and execute multiple statements against the same underlying connection to the database.
As transactions complete, and connections returned to the pool, any set identity or context information is discarded.
Data can be changed at any time by executing SET {CS_IDENTITY | CS_CONTEXT} or RESET {CS_IDENTITY | CS_CONTEXT}.
Session mode is the normal behaviour of Postgres connections in the wild. In Session mode, the connection context lives until the client closes the connection.
The identity is retained until the next SET {CS_IDENTITY | CS_CONTEXT} statement or RESET {CS_IDENTITY | CS_CONTEXT} is called.
In this example, the App has called SET CS_IDENTITY before executing multiple statements.
Both statements will be executed by the proxy with the same identity.
1App   -> Connect
2
3Proxy -> Database Connection
4
5App   -> SET CS_IDENTITY
6
7App   -> Statement
8
9Proxy -> Executes Statement [with CS_IDENTITY]
10
11App   -> Statement
12
13Proxy -> Executes Statement [with CS_IDENTITY]
14
15App   -> Close Connection